Learning Package: Light
Teens
by LearnX Science

Learning Package: Light
Done by: National Institute of Education Group Endeavours in Service Learning Group 10 (Sec/JC 2022) Dora Tay Hui Xuan, Jerine Lim Shu Ting, Ke Shiyao, Wong Chong Tuck, Yap Hui Hian Jane
Introduction
How do we see things around us? Light! Let us watch a video that will teach us more about light.
Everything in life is dependent on light. Plants need light to carry out photosynthesis, while humans need natural light to help us produce Vitamin D and regulate our sleep patterns. Light also enables us to see the beauty of the world around us!
Fun fact: Do you know the word ‘photograph’ evolved from the ancient Greek words ‘phot-’ which means ‘light’ and ‘graph-’ which means writing? So essentially, the word ‘photograph’ means writing with light!
Source: Research guides: Photography: Writing in light: Home. Home - Photography: Writing in Light - Research Guides at Pima Community College. (n.d.). Retrieved July 1, 2022, from https://libguides.pima.edu/photography-writing-in-light
Here are three fun activities below that you can carry out at home to explore more about light and its fascinating properties.
Activity 1: Visualising Laser Light with Water Mist
Background
Have you ever wondered how light travels? In this activity, let us observe light and how it travels through a water mist.
Suggested: If you are unable to find the materials needed at home, watch the video below and read more about the science behind it under ‘Science Time!’.
Materials
● 1 Laser pointer
● Water
● 1 Spray bottle (e.g. empty hand sanitiser spray bottle)
Steps
1. Switch on the laser pointer and shine it at a blank surface (e.g. a wall) in front of you. (Be careful not to shine the laser pointer into your eyes or the eyes of those around you!) What do you observe?
2. Fill up the spray bottle with water.
3. Shine the laser pointer on the wall and get a friend to help to spray water using a spray bottle along the path taken by the laser.
What do you notice this time?
Science Time
Why are we only able to observe the laser as a dot on the wall but unable to see the beam of laser initially?
A unique property of lasers is that it is very collimated. This means that most of the photons (particles of light) are travelling mostly in the same direction.
In this case, most of the photons travel towards the direction of the wall (as seen by the red lines in the diagram above). Hence, very few photons travel to our eyes and we are therefore unable to observe the laser beam.
Upon reaching the wall, photons get reflected off the surface of the wall and into our eyes and appear as a dot.
How does spraying the path taken by the laser allow us to see the laser beam?
When we spray the path taken by the laser with water, the water droplets (seen by the blue circles in the diagram) act as reflective surfaces.
Hence, the photons that come from the laser beam are reflected off the water droplets and into our eyes, allowing us to see the laser beam. However, as the water droplets spread out away from the path taken by the laser, it loses its effect and we have to spray water on the laser path for us to observe the path again.
Bonus Thinking Question
Have you seen the light and water show at Marina Bay? How does it work?
Source: Spectra – a light and water show. Spectra – A Light and Water Show. (n.d.). Retrieved July 1, 2022, from https://www.marinabaysands.com/guides/around-mbs/light-and-sound-show.html
Activity 2: Sunset in a Bottle
In the previous activity, we learned that light travels in a straight line. Now, let’s find out how light can scatter by making your very own sunset in a bottle!
Materials
- 1 Clear bottle/glass with smooth surface (at least 25cm tall)
- Water (enough to fill bottle/glass)
- ¼ cup of milk
- 1 Dropper/teaspoon
- 1 Chopstick
- 1 Torch light that emits white light
Steps and Questions
1. Fill your bottle all the way with tap water.
2. In a dark room, shine your torch light through the water from the top of the bottle and from the side of the bottle.
a. When you look at the bottle from the front, what is the colour of the water?
b. What is the colour of the light travelling through the water?
3. Add milk to the water one drop at a time using your dropper/teaspoon. Stir after each drop with your chopstick, while shining the torch light through the mixture from the top.
a. When you look at the bottle from the front, what colour is the mixture? Is the colour of the mixture the same throughout, or is it different at the top compared to the bottom? Can you explain your observations?
4. Instead of shining the torch light from the top, now shine it from the side of your bottle.
a. What changes do you observe when you shine the light from the side instead of from the top?
b. When viewing the bottle from the side directly opposite your torch light, what is the colour of the light travelling through the mixture?
5. Keep adding drops of milk while shining the torch light from the side. Observe what happens to the colour of light travelling through the mixture.
a. When viewing the bottle from the side directly opposite your torch light, what is the colour of the light travelling through the mixture?
Bonus:
Try different solutions from your kitchen!
Can you replace the milk with other substances (e.g., different flavours of milk, juice, carbonated drinks, soap, detergent, etc.) and still get the same results? What do all these substances have in common?
Science Time
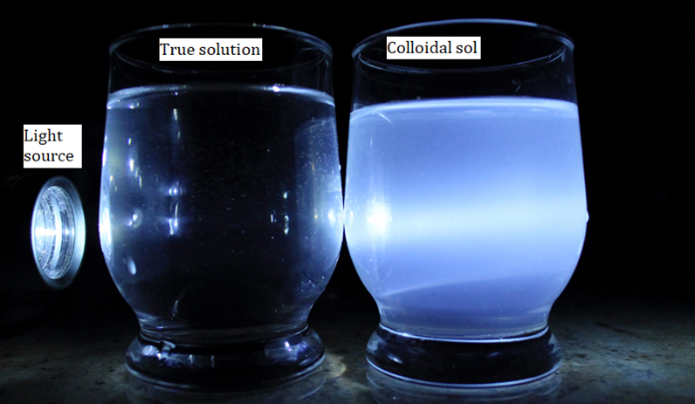
Did you see a “sunset” in your bottle? With only water in your bottle, you should see a colourless solution with a beam of white light passing through. When you add milk to the water, you should see some colour changes of light when viewing the milk-water mixture from the side and from the top. Can you figure out why?
Source: Maths. Siyavula. (n.d.).
Retrieved July 1, 2022, from https://www.siyavula.com/read/science/grade-8/visible-light/12-visible-light?id=toc-id-4
The majority of light that reaches Earth from the sun is white light. White light is a combination of many colours of light, which can be seen in a rainbow when white light is separated into its individual colours by raindrops (as illustrated by the diagram above).
Source: Colours of light. Science Learning Hub. (n.d.).
Retrieved July 1, 2022, from https://www.sciencelearn.org.nz/resources/47-colours-of-light
As seen in the diagram above, each colour is characterised by a certain wavelength. Wavelengths of blue light are shorter and have more energy, while wavelengths of red light are longer with less energy. When light waves hit an object, they can be 1) reflected; 2) absorbed; or 3) scattered and deflected to a different direction.
Why is the sky blue even though most of the light that reaches Earth is white light? This is due to Rayleigh scattering the diagram above).
Source: Solar Power and Rayleigh Scattering - FXSolver. RSS. (2015, August 26).
Retrieved July 1, 2022, from https://www.fxsolver.com/blog/2015/08/26/solar-power-and-rayleigh-scattering/
The white light that reaches Earth interacts with gas molecules in the atmosphere (e.g. nitrogen and oxygen) and is scattered in all directions. However, not all wavelengths of light are scattered the same way. Shorter wavelengths, like blue light, are scattered much more than longer wavelengths in all directions. The scattered blue light is what we see and this is what makes the sky look blue!
At sunset, due to the position of the sun, sunlight has to pass through a greater distance in the atmosphere to reach your eyes. This gives the blue light more time to scatter and a lot more blue light gets scattered away through the atmosphere.
The remaining wavelengths of light that you see are now longer wavelengths that are less scattered, such as orange and red. Small particles in the air enhance the scattering effect, which is why on hazy days, the sunsets appear even redder!
Source: Zakiyah Zakariah
Can you now explain the colours you saw in your milk-water mixture? Milk is an emulsion, which means it consists of tiny insoluble fat particles dispersed in the mixture.
Source: Vanstone, E. (2022, May 6). What is an emulsion? Science Experiments for Kids.
Retrieved July 1, 2022, from https://www.science-sparks.com/what-is-an-emulsion/
When you point your torch light at the milk-water mixture, the light waves interact with the fat particles in the mixture and get scattered - the same way sunlight gets scattered by gas molecules in the atmosphere!
As blue light gets scattered most, your solution should have appeared slightly blue. Shining light from the top through the solution increases the distance the light waves have to travel through the mixture. That means that blue light can be scattered away even more throughout the solution. This is why at the bottom of the bottle, there is almost no blue light left anymore and it looks yellow or orange.
As you add more drops of milk, almost all the blue light is scattered away by the particles in the mixture. This is why the colour of the light you see through the mixture becomes orange, just like a sunset!
Source: Zakiyah Zakariah
Activity 3: 3D Hologram Projector
Background
Have you ever seen holograms in movies? Holograms have been a huge part of science fiction blockbuster movies, such as the Iron Man and Star Wars franchises. It may seem like having a hologram is a far-fetched idea meant for a euphoric world. What if YOU can create your very own 3D hologram from the comfort of your home?
Source: Kingsman: The secret service - jellyfish. Jellyfish Pictures. (n.d.).
From the previous activities, you would have learned some of the fundamental concepts of light. With the knowledge that light travels in a straight line, let’s explore how a “floating image” is produced through the use of a hologram projector!
Materials
● 1 piece of stiff plastic sheet (You can also use recycled items such as an old CD case or disposable food containers)
● Template in Annex A (If you do not have access to a printer, you can also make your own template! Draw a basic “Trapezoid” on a piece of paper based on the dimensions in Annex A.)
● 1 Smartphone
● 1 piece of Clear tape
● 1 pair of Scissors
● 1 Ruler
● 1 Marker/ Pen
Steps
1. Trace the template on the transparent film using your marker and ruler.
2. Cut out along the black outline. (Be careful with the sharp scissors! Get an adult to help you with it!)
3. Fold along the lines in red.
4. Stick the two edges together with clear tape to form a pyramid.
5. Play any of the 3D videos found in Annex B on your smartphone.
You can search for ‘hologram video four side pyramid’ videos on YouTube or you can choose some suggested videos from the links below!
Iron Man’s Jarvis Interface: https://www.youtube.com/watch?v=JHYfSBl-n_g
Minions: https://www.youtube.com/watch?v=cez0fMA4jR8
Animals: https://www.youtube.com/watch?v=TcUHV6bHOeg
Fireworks: https://www.youtube.com/watch?v=XaGhAYseIFg
Disneyland Fireworks: https://www.youtube.com/watch?v=zqXi1Pp5tx4
Moon: https://www.youtube.com/watch?v=5DZ6D70m0pU
Sun: https://www.youtube.com/watch?v=e5DOApUtf7M
Blooming flowers: https://www.youtube.com/watch?v=asNoWcrfebk
Frozen: https://www.youtube.com/watch?v=1TRcEuzM8MU
Inside Out: https://www.youtube.com/watch?v=_dmagX3_aJ4
1. Place the pyramid at the centre of your device (in between the 4 moving images).
2. Now, switch off the lights and get down to the same level as the device, watch, and enjoy!
Bonus:
1. What happens when you try to touch the “floating image”?
2. Use your finger to block the inner face of the pyramid. Are you still able to see the image?
3. Use your finger to block the video (under the plastic pyramid that hangs over) on your smartphone. Are you still able to see the image?
4. Compare the hologram image and the image on the smartphone.
Science Time
How is the hologram image formed? The 3D hologram projector works on the principle of Pepper’s Ghost. In a Pepper’s Ghost Illusion, when a real image is reflected in a transparent screen at a 45-degree angle, viewers see a reflected virtual image that seems to have depth and appear out of nowhere.
Source: Henderson, K. (2022, June 13). Pepper’s Ghost: Hologram Illusion. Science World.
Retrieved July 1, 2022, from https://www.scienceworld.ca/resource/peppers-ghost-hologram-illusion/
Four symmetrically opposite variations of the same image are projected onto the four faces of the pyramid. By principle, each side projects the image falling on it to the center of the pyramid. These projections work in unison to form a whole figure, which creates a 3D illusion.
By playing the videos, light rays are emitted from your smartphone and off the projection pyramid. The reflected light ray will now travel into your eyes, allowing you to see the moving images! Since the image formed in virtual, it is not projected on a screen but rather, appears to be floating in midair.
-
Check out the book recommendations below!
Optics for Dummies

Authors: Galen Duree, Jr.
Publisher: Hoboken, N.J.: Wiley Publishing, 2011
Also available as an eBook on NLB Overdrive.
An illuminating exploration of optics. Discover how the fundamentals of optical technologies help brighten your everyday life.
Planet of Science: The Universal Encyclopedia of Scientists
Author: Fischetti
Illustrator: Bouzard Guillaume
Publisher: Europe Comics, 2020
Also available as an eBook on NLB Overdrive.
Explore the greatest scientific breakthroughs of all time through the fascinating lives of the people who made them.
Book covers are the copyright of their respective publishers.